Selenium: The Quick and Dirty Guide in 6 Steps
Selenium: The Quick and Dirty Guide
With so many huge tutorials about building huge Selenium Frameworks using the Page Object Model and other fancy words, you should know about it. I thought it could be helpful to have one tutorial, just a quick and dirty guide to plain Selenium.
Going into this tutorial, remember that I do not recommend using Selenium this way. This is just a way to introduce new people to Selenium, and this approach is not easily maintainable. Look at this tutorial to learn how to make a “proper” Selenium framework.
What you’ll need
First of all, you need to pick a programming language. Selenium has bindings for all major languages, but we’ll use Python for this tutorial. Why? Because Python is cool.
You’ll also need:
- An IDE or a Text Editor depending on the language you choose
- A Web driver executable in a known path for this tutorial will be a chrome driver. (In Windows, Selenium’s default path is C:\Windows, for Mac, you can install it with cask using this command: brew cask install chrome driver)
- A Unit Test Framework, which in our case will be pytest.
The basics
Let’s break Selenium down to its most basic definition. Selenium can be used to simulate user actions in a browser. Taking that to the testing genre, the most basic use of Selenium we can do is to create a simple test that opens a browser, looks for some sort of element, interacts with it, and validates its interaction.
Based on this, what our very simple test will do is it will go into Google, search for a proper Selenium Tutorial, and click it. Sounds good? Let’s start
The structure
The first thing we need is very simple. A class to write our test cases. We’ll create a simple test_cases.py file with the class QuickAndDirtySeleniumExample in it. We’ll also need to import the unit test package to be able to create test cases within this class.
import unittest

class QuickAndDirtySeleniumExample(unittest.TestCase):
Then, we need to start writing our test case. Since we’re not using any specific pattern or practice, we won’t spend time here going through the design of our solution. Remember, this is just a quick and dirty introduction.
Our Test Case will be named test_search_proper_tutorial. Also, don’t forget to add the last two lines that the code has in this sample. This is how we tell Python that this class is our main test class on which we’ll execute our test cases.
import unittest

class QuickAndDirtySeleniumExample(unittest.TestCase):

    def test_search_proper_tutorial(self):
        # This is our test case

if __name__ == '__main__':
    unittest.main()
The test
So… We have our “project,” we have our test class, and everything left to do is to just go ahead and write our test case. For this, first, we need to organize in our head the steps we need to get to our goal. In this case, these steps are:
-
- Launch the Browser
- Go to Google.com
- Locate the Search text box
- Write the name of a proper Selenium tutorial
- Do the search
- Locate our proper Selenium tutorial
- Click on it
- Validate we are indeed in the correct place
1. Launching the Browser
To launch the browser, we need to create a new instance of our Webdriver. The web driver represents the browser and is who allows us to interact with it. To be able to instantiate it, we need to import it with the following line on the top of our test_cases.py file.
from selenium import webdriver
With this in place, we can create a new web driver instance using Chrome. Our test_cases.py file should now look like this:
import unittest
from selenium import webdriver


class QuickAndDirtySeleniumExample(unittest.TestCase):

    def test_search_proper_tutorial(self):
        driver = webdriver.Chrome()


if __name__ == '__main__':
    unittest.main()
2. Go to Google.com
For this, all we need to do is to tell our driver to navigate to https://www.google.com/. This is done using the get() method.
After adding this, our test_cases.py file should look like this:
import unittest
from selenium import webdriver


class QuickAndDirtySeleniumExample(unittest.TestCase):

    def test_search_proper_tutorial(self):
        driver = webdriver.Chrome()
        driver.get("https://www.google.com/")


if __name__ == '__main__':
    unittest.main()
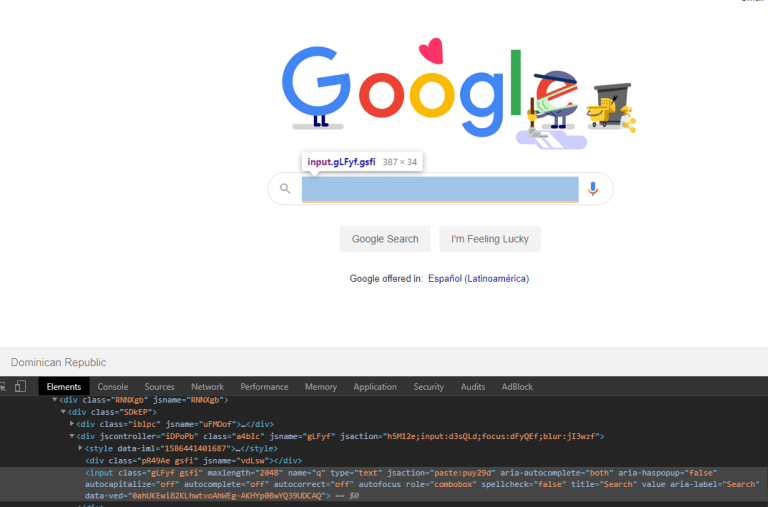
3. Locate the Search text box
Now that we’re on Google, we need to locate the Search text box so we can later interact with it. For this, the web driver comes with a series of find_element methods. This is arguably one of the most powerful and important parts of Selenium, so I recommend you play around with it a bit.
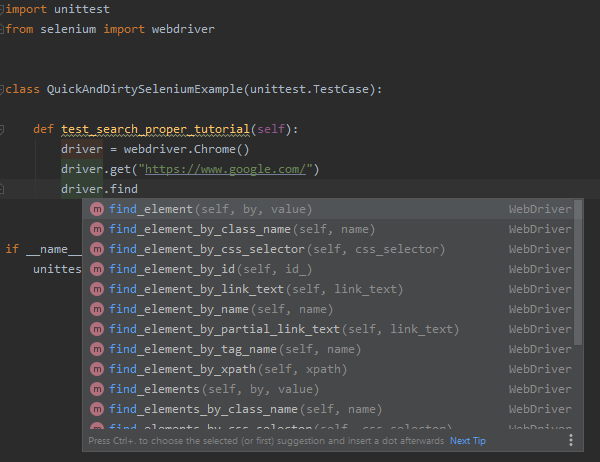
In this case, we’ll use the find_element_by_name method since the Google Search textbox already has this property set and seems unique.
Take into account that this won’t always be the case. There will be sites with elements that don’t seem to have a clear way of identifying them. For those, take a look at this tutorial.
At this point, our test_file.py will look like this:
import unittest
from selenium import webdriver


class QuickAndDirtySeleniumExample(unittest.TestCase):

    def test_search_proper_tutorial(self):
        driver = webdriver.Chrome()
        driver.get("https://www.google.com/")
        searchbox = driver.find_element_by_name("q")


if __name__ == '__main__':
    unittest.main()
4. Write on the Search box
To write into a text box (or pretty much any element that accepts text as an input), we use the function send_keys(). Something very interesting about this function is that when used in conjunction with Selenium’s Keys library (selenium.webdriver.common.Keys), you can use send_keys() to send things like entering, Backspace, any weird combination you might want to do with arrow keys, etc. In this case, we’ll search for “selenium automation framework qaboy” and press Enter.
import unittest
from selenium import webdriver
from selenium.webdriver.common.keys import Keys


class QuickAndDirtySeleniumExample(unittest.TestCase):

    def test_search_proper_tutorial(self):
        driver = webdriver.Chrome()
        driver.get("https://www.google.com/")
        searchbox = driver.find_element_by_name("q")
        searchbox.send_keys("selenium automation framework qaboy")
        searchbox.send_keys(Keys.ENTER)


if __name__ == '__main__':
    unittest.main()
At this point, we have searched for our proper tutorial, and we just need to identify which of the results from Google is the one we expect.
5. Search for our Tutorial
In this step, we’ll need to dab into what XPath is. Since the search results from Google can vary quite a bit, we don’t have a clear way to identify our desired search results. XPath gives us the possibility to make a query to search for whatever tag or property within the site and can allow us to search using a certain level of logic. Xpath is very powerful, but it also tends to be brittle and takes a longer time to execute. Here I talk a little bit more about it.
We will use our actual link to search for the element; this info is stored under the href property.
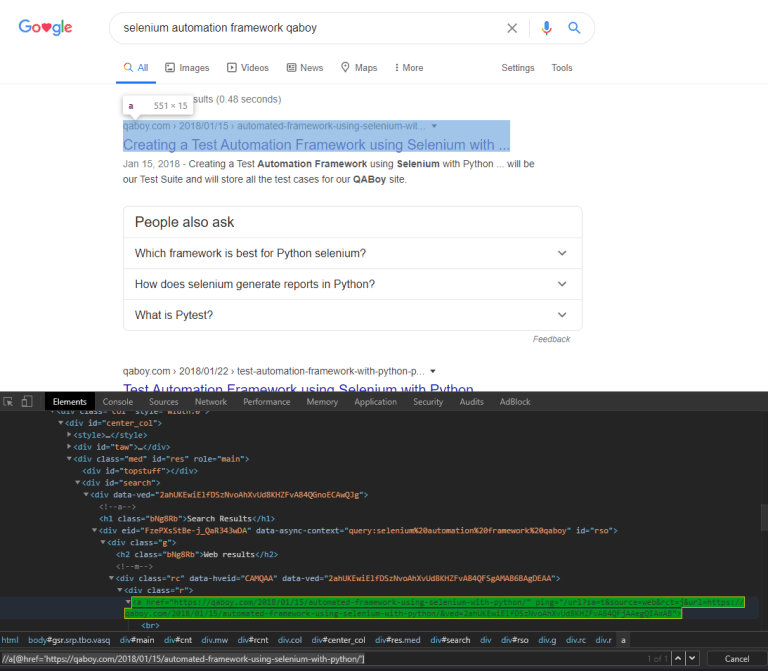
And once we find our desired element, we can just go ahead and click it. Our code should now look like this:
import unittest
from selenium import webdriver
from selenium.webdriver.common.keys import Keys


class QuickAndDirtySeleniumExample(unittest.TestCase):

    def test_search_proper_tutorial(self):
        driver = webdriver.Chrome()
        driver.get("https://www.google.com/")
        searchbox = driver.find_element_by_name("q")
        searchbox.send_keys("selenium automation framework qaboy")
        searchbox.send_keys(Keys.ENTER)
        link = driver.find_element_by_xpath(
            "//a[@href='https://qaboy.com/2018/01/15/automated-framework-using-selenium-with-python/']")
        link.click()


if __name__ == '__main__':
    unittest.main()
6. Validate our result!
Now we just have to validate we got our desired result! This is as simple as just checking that we can find an element we expect to see on this site. In this case, we’ll look for the Article title, which has a class called “entry-title” we can use to identify it. But we’ll do it a bit differently.
Since, in this case, we’re specifically validating that we can find this element, we’ll do it with an assertion. In tests, an assertion is just the confirmation of a condition, and usually, they are structured in the following way:
assert {condition}, {Failure message}
Taking this to our code, we would get something like this:
import unittest
from selenium import webdriver
from selenium.webdriver.common.keys import Keys


class QuickAndDirtySeleniumExample(unittest.TestCase):


def test_search_proper_tutorial(self):
        driver = webdriver.Chrome()
        driver.get("https://www.google.com/")
        searchbox = driver.find_element_by_name("q")
        searchbox.send_keys("selenium automation framework qaboy")
        searchbox.send_keys(Keys.ENTER)
        link = driver.find_element_by_xpath(
            "//a[@href='https://qaboy.com/2018/01/15/automated-framework-using-selenium-with-python/']")
        link.click()
        assert driver.find_element_by_class_name("entry-title"), "Element was not found."


if __name__ == '__main__':
    unittest.main()
And with this… We’re done!
Now you just need to run the test with the following command:
python -m pytest test_cases.py
And that’s it!
Author: Mike Arias
Senior Software Testing Engineer of TechAID.
Twitter: @theqaboy
Blog: qaboy.com/
OTHER POSTS YOU MIGHT LIKE
API Testing Tools: An Example-Based Guide
API Testing Tools For API testing, there are many tools out there that let you perform the test and collect the results. In this article, We will focus on three tools by showing how to make a request using the Trello API. But before…
If Clauses vs. ASSERT Statements – When to use which one?
If Clauses vs. ASSERT Statements – When to use which one? If clauses and ASSERT statements serve different, yet similar functions. This article aims to establish once and for all when to use “if” and when to use “asserts” in our test cases. There will…