
How to run tests remotely in BrowserStack with Selenium
How to run tests remotely in BrowserStack with Selenium
BrowserStack is one of several services that can be used to run a test remotely. Imagine the possibility of testing your system in absolutely any environment. Having that chance is the holy grail of testing since it takes a lot of the guessing game out of the equation.
With BrowserStack, you can run your automated tests for either web or mobile apps, but you can also run manual tests in virtual devices. For this tutorial, we’ll focus on the automated part of it with web applications.

THE PROJECT
We’ll use this automated test framework as a codebase for this tutorial. If you’re interested in knowing how that framework was made step by step, you can look at this tutorial. Also, if you want to look at other Selenium tutorials, take a look at this.
THE SETUP
Before touching our code, we need to create a BrowserStack account. For this, go to https://www.browserstack.com/automate, click the free trial button in the upper right corner and create an account.
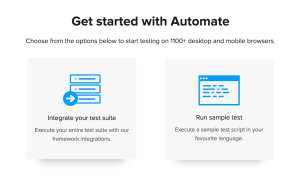
Now that we’re inside the Automate section of BrowserStack, we need to find the capabilities we’ll need for our tests. For this, click the “Integrate your test suite” option.
You’ll be prompted to select a language; we’ll choose Python (Also, make sure that you have pop-ups enabled). That will take you to their documentation page for Python here, which will guide you on how to install Selenium to get the basic prerequisites sorted out. This is unnecessary since we already prepared our environment using this tutorial from which we got our codebase.
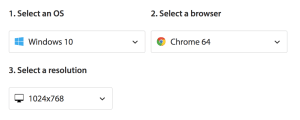
What we do need to do is to select the OS, device, and resolution we want our tests to run. This will give us our desired capabilities.
THE CODE
BrowserStack will now generate all the code we need to use it as we want. We will make a few small changes to this code to make it more usable.
|
from selenium import webdriver desired_cap = { driver = webdriver.Remote( driver.get(“http://www.google.com”) |
Our web driver looks like this at the moment:
|
from selenium import webdriver class Driver: def __init__(self): def navigate(self, url): |
First, we’ll add the desired capabilities as an attribute of the class.
|
from selenium import webdriver class Driver: def __init__(self): } self.instance = webdriver.Chrome() def navigate(self, url): |
Now, instead of using a web driver.Chrome() to initiate our driver, we’ll use a web driver.Remote(). We’ll pass the URL of the hub on which our tests will run and the desired capabilities.
|
class Driver: def __init__(self): self.instance = webdriver.Remote( def navigate(self, url): |
And with these tiny changes to our code, we’re done! Now all that’s left is to run our code. BrowserStack will give us a video, all the logs of the execution, and report back to us.
You can use a similar process to achieve the same results with another service like SauceLabs or even running native apps in the App Automate Section (with some small variations).
What are your thoughts on this? Share it down in the comments.
Author: Mike Arias
Senior Software Testing Engineer of TechAID.
Twitter: @theqaboy
Blog: qaboy.com/
OTHER POSTS YOU MIGHT LIKE
API Testing Tools: An Example-Based Guide
API Testing Tools For API testing, there are many tools out there that let you perform the test and collect the results. In this article, We will focus on three tools by showing how to make a request using the Trello API. But before…
If Clauses vs. ASSERT Statements – When to use which one?
If Clauses vs. ASSERT Statements – When to use which one? If clauses and ASSERT statements serve different, yet similar functions. This article aims to establish once and for all when to use “if” and when to use “asserts” in our test cases. There will…